%20--%3e%3cpath%20d='M17.73,0v114.51H0V0h17.73Z'/%3e%3cpath%20d='M51.88,114.5h-16.47V26.14h14.33l.72,7.34c4.84-5.91,11.46-8.95,19.52-8.95,14.68,0,22.92,10.74,22.92,30.98v59h-16.47v-58.64c0-11.82-3.94-16.65-11.46-16.65-6.09,0-10.39,3.04-13.07,6.98v68.3h-.02Z'/%3e%3cpath%20d='M124.94,114.5h-16.47V26.14h14.33l.72,7.34c4.84-5.91,11.46-8.95,19.52-8.95,14.68,0,22.92,10.74,22.92,30.98v59h-16.47v-58.64c0-11.82-3.94-16.65-11.46-16.65-6.09,0-10.39,3.04-13.07,6.98v68.3h-.02Z'/%3e%3cpath%20d='M236.85,86.39c0,17.01-9.85,29.72-28.83,29.72s-28.83-12.53-28.83-29.72v-31.78c0-17.19,9.67-30.08,28.83-30.08s28.83,12.71,28.83,30.08v31.78ZM195.49,85.67c0,11.28,4.12,16.83,12.53,16.83s12.36-5.55,12.36-16.83v-30.53c0-11.28-3.94-16.83-12.36-16.83s-12.53,5.55-12.53,16.83v30.53Z'/%3e%3cpath%20d='M250.1,46.02c4.48-12.71,12.89-21.67,26.5-21.67,17.01,0,24.17,11.64,24.17,28.47v44.67c0,3.94,1.79,6.27,5.37,6.27h0l4.06,10.01c-3.09,1.3-7.1,1.81-9.79,1.81-6.8,0-10.92-3.04-13.43-7.16-4.83,5.19-10.92,7.52-18.08,7.52-12.89,0-21.13-9.85-21.13-24.89,0-16.47,8.59-29.19,32.05-29.19h4.48v-9.22c0-10.56-3.22-14.5-9.85-14.5-5.73,0-10.21,4.12-13.25,12.89l-11.1-5.01ZM284.3,97.13v-23.1h-4.48c-12,0-16.29,5.73-16.29,15.58,0,10.56,3.76,13.97,9.31,13.97,5.2,0,8.6-2.15,11.46-6.45Z'/%3e%3cpath%20d='M356.82,50.85c-2.15-8.95-6.44-12.35-12.18-12.35-7.7,0-12.36,4.83-12.36,16.65v30.35c0,11.82,4.48,16.83,12.36,16.83,6.09,0,10.03-3.58,12.36-12.89l12.36,3.94c-3.58,14.32-12.36,22.74-26.14,22.74-18.26,0-27.22-13.61-27.22-29.9v-31.6c0-16.83,9.13-30.08,27.22-30.08,12.89,0,22.2,8.24,25.78,22.2l-12.18,4.11Z'/%3e%3cpath%20d='M416.63,43.15h-17.01v48.61c0,7.34,3.4,10.92,9.13,10.92,2.33,0,3.38-.11,4.47-.54l3.76,9.85c-3.76,2.33-8.42,3.94-14.15,3.94-13.61,0-19.7-8.41-19.7-24.71v-47.18l-9.31-2.33v-11.63l10.21-.72.57-14.93,15.01-4.77v20.05h17.01v13.44h0Z'/%3e%3cpath%20d='M446.53,26.14v88.36h-16.47V26.14h16.47ZM445.64,0v17.55h-14.86V0h14.86Z'/%3e%3cpath%20d='M500.79,114.5h-18.8l-24.35-88.36h18.08l15.76,72.07,15.94-72.07h18.08l-24.71,88.36Z'/%3e%3cpath%20d='M548.06,73.41v12.08c0,11.28,4.66,16.83,13.25,16.83,6.8,0,10.56-3.76,13.43-14.15l12.36,3.94c-3.76,16.29-12.36,23.99-27.4,23.99-18.26,0-27.93-12.89-27.93-30.08v-31.6c0-16.83,9.49-29.9,27.93-29.9s27.04,13.25,27.04,30.62v18.26h-38.68ZM548.06,62.49h23.82v-8.77c0-10.74-4.12-15.76-11.82-15.76-8.24,0-12,5.19-12,15.76v8.77Z'/%3e%3cpath%20d='M614.75,107.12c0,4.4-3.69,8.99-8.77,8.99s-8.77-4.59-8.77-8.99v-1.23c0-4.4,3.62-8.92,8.77-8.92s8.77,4.52,8.77,8.92v1.23ZM599,107.12c0,3.88,2.87,7.2,6.9,7.2s7.13-3.32,7.13-7.2v-1.23c0-3.95-2.95-7.28-7.13-7.28s-6.9,3.32-6.9,7.28v1.23ZM605.91,107.94h-1.34v3.77h-2.31v-10.86h4.03c2.69,0,3.95,1.34,3.95,3.51,0,1.64-.75,2.84-2.16,3.21l2.61,4.14h-2.46l-2.32-3.77ZM604.56,106.3h1.64c1.27,0,1.64-.67,1.64-1.87s-.37-1.72-1.64-1.72h-1.64v3.59Z'/%3e%3c/svg%3e)
Scheduling a session allows you to plan a streaming experience in advance and invite participants to join at a specific time. Each accepted participant is guaranteed a hot VM with the application pre-installed at the scheduled start, so everyone joins on time without waiting for provisioning or app installation.
This is useful for demos, internal reviews, training sessions, and collaboration meetings — including multi-user experiences when the streamed application supports them.
Before you schedule
- Participants must be Portal users. They need an account in your Portal organisation (or an organisation you can invite from). External guests without a Portal account cannot be added to a scheduled session.
- Each participant runs their own streaming session on their own VM at the scheduled time. Scheduling guarantees the hot-VM start for every attendee; a joint multi-user experience in the same scene only happens if the streamed application itself supports multi-user sessions.
Schedule a streaming session
- Open Innoactive Portal.
- Navigate to the application you want to use.
- Open the actions menu (⋮).
- Click Schedule Session.
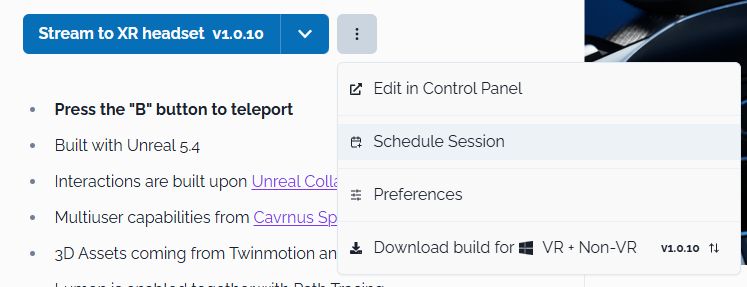
Configure the session
Fill in the required information:
- Event Name – name of the session.
- Start Time – when the session begins.
- End Time – when the session ends.
- Participants – users invited to the session.
You can search and add multiple participants.
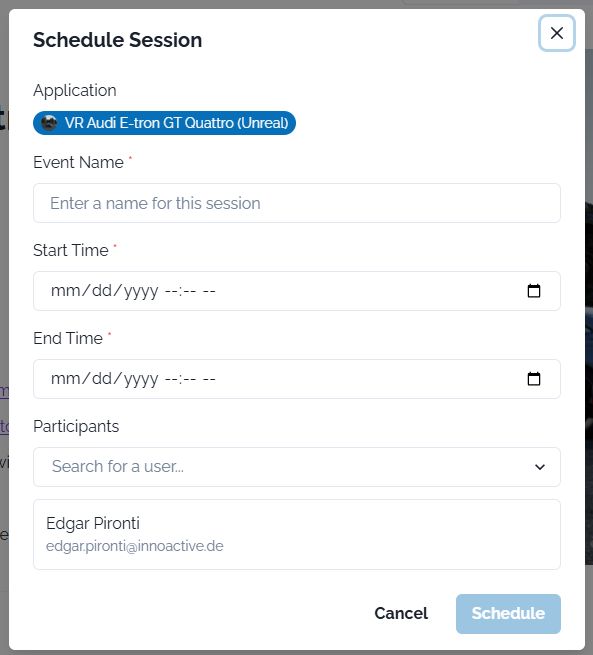
Click Schedule to create the event.
How participants receive the invitation
Once the session is scheduled, invited participants are notified in two ways:
- Automatically in Portal — every invited user sees the session in their Portal menu and can accept or decline it from there.
- Via a manual link you share — the confirmation window that appears after scheduling contains an RSVP link. Send this link yourself (email, Teams, or any other channel) — Portal does not send an email on your behalf.
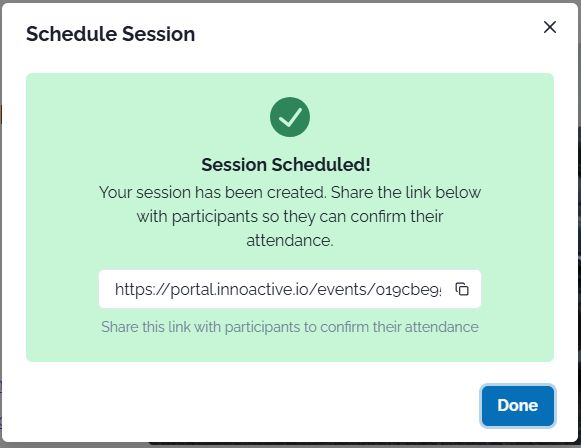
Participants can open the link (or use the Portal-menu notification) to view the session details and accept or decline the invitation.
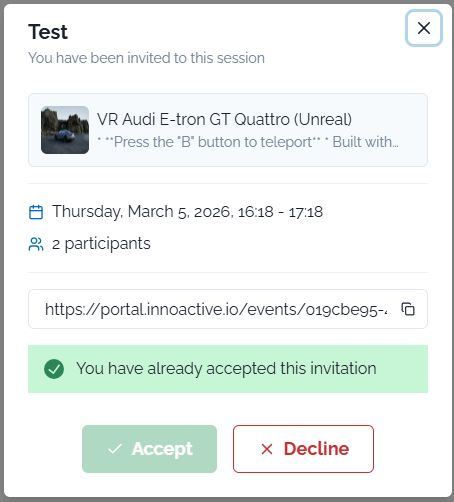
What happens when a participant accepts
When a participant accepts — either from the Portal menu or from the shared link — Portal registers them as attending. 15 minutes before the scheduled start, Portal provisions a dedicated VM for that participant with the streamed application already installed. Every accepted participant gets their own VM, so all attendees can begin streaming immediately at the scheduled time without waiting for provisioning or an install step.
Participants who never accept do not get a VM provisioned for them.
Tips
- Schedule sessions when preparing customer demos or workshops.
- Add participants in advance so they receive the Portal notification immediately, and send the manual RSVP link ahead of the meeting — a VM only starts warming up once the participant accepts, so late acceptances lose the hot-start benefit.
- If your goal is a shared multi-user experience in the same scene, confirm that the streamed application itself supports multi-user sessions. Scheduling only guarantees a synchronised hot-start; it doesn't join participants into a common session by itself.