%20--%3e%3cpath%20d='M17.73,0v114.51H0V0h17.73Z'/%3e%3cpath%20d='M51.88,114.5h-16.47V26.14h14.33l.72,7.34c4.84-5.91,11.46-8.95,19.52-8.95,14.68,0,22.92,10.74,22.92,30.98v59h-16.47v-58.64c0-11.82-3.94-16.65-11.46-16.65-6.09,0-10.39,3.04-13.07,6.98v68.3h-.02Z'/%3e%3cpath%20d='M124.94,114.5h-16.47V26.14h14.33l.72,7.34c4.84-5.91,11.46-8.95,19.52-8.95,14.68,0,22.92,10.74,22.92,30.98v59h-16.47v-58.64c0-11.82-3.94-16.65-11.46-16.65-6.09,0-10.39,3.04-13.07,6.98v68.3h-.02Z'/%3e%3cpath%20d='M236.85,86.39c0,17.01-9.85,29.72-28.83,29.72s-28.83-12.53-28.83-29.72v-31.78c0-17.19,9.67-30.08,28.83-30.08s28.83,12.71,28.83,30.08v31.78ZM195.49,85.67c0,11.28,4.12,16.83,12.53,16.83s12.36-5.55,12.36-16.83v-30.53c0-11.28-3.94-16.83-12.36-16.83s-12.53,5.55-12.53,16.83v30.53Z'/%3e%3cpath%20d='M250.1,46.02c4.48-12.71,12.89-21.67,26.5-21.67,17.01,0,24.17,11.64,24.17,28.47v44.67c0,3.94,1.79,6.27,5.37,6.27h0l4.06,10.01c-3.09,1.3-7.1,1.81-9.79,1.81-6.8,0-10.92-3.04-13.43-7.16-4.83,5.19-10.92,7.52-18.08,7.52-12.89,0-21.13-9.85-21.13-24.89,0-16.47,8.59-29.19,32.05-29.19h4.48v-9.22c0-10.56-3.22-14.5-9.85-14.5-5.73,0-10.21,4.12-13.25,12.89l-11.1-5.01ZM284.3,97.13v-23.1h-4.48c-12,0-16.29,5.73-16.29,15.58,0,10.56,3.76,13.97,9.31,13.97,5.2,0,8.6-2.15,11.46-6.45Z'/%3e%3cpath%20d='M356.82,50.85c-2.15-8.95-6.44-12.35-12.18-12.35-7.7,0-12.36,4.83-12.36,16.65v30.35c0,11.82,4.48,16.83,12.36,16.83,6.09,0,10.03-3.58,12.36-12.89l12.36,3.94c-3.58,14.32-12.36,22.74-26.14,22.74-18.26,0-27.22-13.61-27.22-29.9v-31.6c0-16.83,9.13-30.08,27.22-30.08,12.89,0,22.2,8.24,25.78,22.2l-12.18,4.11Z'/%3e%3cpath%20d='M416.63,43.15h-17.01v48.61c0,7.34,3.4,10.92,9.13,10.92,2.33,0,3.38-.11,4.47-.54l3.76,9.85c-3.76,2.33-8.42,3.94-14.15,3.94-13.61,0-19.7-8.41-19.7-24.71v-47.18l-9.31-2.33v-11.63l10.21-.72.57-14.93,15.01-4.77v20.05h17.01v13.44h0Z'/%3e%3cpath%20d='M446.53,26.14v88.36h-16.47V26.14h16.47ZM445.64,0v17.55h-14.86V0h14.86Z'/%3e%3cpath%20d='M500.79,114.5h-18.8l-24.35-88.36h18.08l15.76,72.07,15.94-72.07h18.08l-24.71,88.36Z'/%3e%3cpath%20d='M548.06,73.41v12.08c0,11.28,4.66,16.83,13.25,16.83,6.8,0,10.56-3.76,13.43-14.15l12.36,3.94c-3.76,16.29-12.36,23.99-27.4,23.99-18.26,0-27.93-12.89-27.93-30.08v-31.6c0-16.83,9.49-29.9,27.93-29.9s27.04,13.25,27.04,30.62v18.26h-38.68ZM548.06,62.49h23.82v-8.77c0-10.74-4.12-15.76-11.82-15.76-8.24,0-12,5.19-12,15.76v8.77Z'/%3e%3cpath%20d='M614.75,107.12c0,4.4-3.69,8.99-8.77,8.99s-8.77-4.59-8.77-8.99v-1.23c0-4.4,3.62-8.92,8.77-8.92s8.77,4.52,8.77,8.92v1.23ZM599,107.12c0,3.88,2.87,7.2,6.9,7.2s7.13-3.32,7.13-7.2v-1.23c0-3.95-2.95-7.28-7.13-7.28s-6.9,3.32-6.9,7.28v1.23ZM605.91,107.94h-1.34v3.77h-2.31v-10.86h4.03c2.69,0,3.95,1.34,3.95,3.51,0,1.64-.75,2.84-2.16,3.21l2.61,4.14h-2.46l-2.32-3.77ZM604.56,106.3h1.64c1.27,0,1.64-.67,1.64-1.87s-.37-1.72-1.64-1.72h-1.64v3.59Z'/%3e%3c/svg%3e)
A run pipeline is the list of steps Portal runs on the cloud-rendering server every time someone starts your application in a cloud-rendered session. You can use it to:
- choose whether Portal or your application manages the XR runtime
- pass environment variables and credentials stored encrypted on Portal to your application
- sign the user in to your own identity provider before the app starts
- start the app under a dedicated Windows account
None of this requires changing or rebuilding the application.
Pipelines are configured per application and apply to cloud-rendered sessions only. Applications that run on the user's own device ignore them.
Where to find it
- In the Portal Control Panel, open Applications and select your application.
- Open the Streaming tab.
- Scroll to the Run Pipeline section at the bottom of the tab.

The Streaming tab is visible if you are allowed to change the application and the application has a Windows build.
Who can change a pipeline matters. Anyone who can change an application decides what runs on the server and which secrets the application receives. Grant that permission accordingly — see User groups and permissions.
How a pipeline runs
Each pipeline has three stages:
| Stage | Runs | When a step fails |
|---|---|---|
| Setup | Before the application starts | The launch stops |
| Run | Right before the program starts; ends with the application launch | The launch stops |
| Teardown | After the application exits — and also after a failed launch | Teardown continues with the next step |
Setup and Run execute their steps from top to bottom before the application starts. The last step of Run starts your program; if you don't add one, Portal adds the standard launch of your build automatically. A failing step stops the launch and ends the session with an error. Teardown always runs, so clean-up steps get their turn even after a failed launch. Each step has a default timeout of 60 seconds.
Reading the pipeline
The Run Pipeline section lists every step the server runs for this application, in order. Some steps carry a badge:
- Default — what Portal does when you have not chosen otherwise, for example the launch of the build's executable or the platform-managed XR runtime. Edit a Default step to replace it with your own choice.
- Automatic — follows from another step or from your build, and changes only with it.
- Read-only — a step type the editor cannot edit.
You don't add anything to Teardown yourself: teardown steps are written for you by the steps that need them.
Adding and changing steps
- In the stage you want, select + Add step.
- Pick a Step type, fill in its fields and, optionally, give the step a Name.
- Select Save step. The pipeline is saved straight away.
To reorder, change or remove a step, open its step options menu: Move up, Move down, Edit step, Delete step.
Changes apply to sessions started after you save; running sessions keep the pipeline they started with. The pipeline belongs to the application, so it applies to all of its builds.
Step reference
| Step | Stage | What it does | You set |
|---|---|---|---|
| XR runtime management | Setup | Chooses who is responsible for the XR runtime: Platform-managed (recommended) or Application-managed — see the comparison below. Shown for applications with a Windows XR build. | The mode |
| Wait for a streaming client before launching | Setup | Holds the launch until a headset is streaming, so the application starts in XR rather than desktop mode. Waiting time is billed. | Nothing |
| Environment variables | Run | Adds environment variables to the application's process. | A name and a value per variable; values may contain template variables |
| Secrets | Run | Passes application secrets to the application as environment variables. Secrets are also added, replaced and deleted here. | A variable name and the secret it receives |
| Run as a Windows user | Run | Starts the application under a local Windows account created for the session and removed afterwards. | Windows username (default {{session.user_preferred_username}}) |
| Sign in to an identity provider | Run, before the launch | Signs the streaming user in at your OpenID Connect or OAuth2 provider and passes the tokens to the application. | Issuer or endpoints, client ID, client secret, scopes, token variable names |
| Require access-control authorization | Run | Turns on the Innoactive Access Control handshake when Portal did not detect the plugin in your build. It does not protect the app by itself; the plugin inside the app enforces it. See How to implement access control. | Nothing |
| App launch (host application) | Run, last | Decides what the server starts: preinstalled software such as Autodesk VRED Core opening your content, or a program path you enter. Without this step, the build's own executable starts. | Host application or program, arguments, working directory |
Steps Portal adds by itself:
- Windows account created / removed — come with Run as a Windows user and always use the same username.
- Authorization required — when Portal detects the Innoactive Access Control plugin in the build.
- Sign-out — after Sign in to an identity provider, Portal revokes the refresh token where the provider supports it. This step is not shown in the editor.
Rules
- Steps in a stage run from top to bottom. When two steps set the same variable, the lower one wins.
- A pipeline holds at most one each of: App launch, Sign in, Require access-control authorization, Wait for a streaming client, XR runtime management.
- Sign in to an identity provider must come before App launch. The editor places it there for you.
- A failing step stops the launch. Only the sign-in step can be told to continue instead (Start the app without the tokens if the sign-in fails).
Platform-managed or application-managed XR runtime
The XR runtime management step decides who is responsible for the XR runtime on the server.
| Platform-managed (recommended) | Application-managed | |
|---|---|---|
| Who is responsible | Portal | Your application, or the wrapper that starts it |
| What that covers | Portal configures the XR runtime, starts it before the application and stops it after the session. | The application configures, starts and stops the XR runtime itself. Portal brings up no XR runtime for the launch. |
| Choose it when | The application works with the XR runtime Portal provides. This is the case for most applications. | The application needs a different XR runtime, a specific runtime configuration, or has to start the runtime at a different point in time. |
An application-managed XR runtime must be fully stopped when the session ends. The server is reused for the next session, and an XR runtime left running there can make that session fail. Make sure your application or its wrapper shuts the runtime down completely on exit, including when the application crashes or is closed from Portal.
Template variables
Step values can contain template variables, which Portal fills in when a session launches. Use them anywhere in a value, for example Password={{secret.db_password}};User={{session.user_email}}. Variable names on the left of an environment variable are never filled in.
| Variable | Becomes | Works in |
|---|---|---|
{{session.user_preferred_username}} | The SSO user name (preferred_username) of the person starting the session | Any step |
{{session.user_email}} | That person's Portal email address | Any step |
{{session.id}} | The session's ID | Any step |
{{session.launch_arguments}} | The launch arguments composed for the session, including the build's own | Any step |
{{app.id}} | The application's ID | Any step |
{{secret.<key>}} | The value of the application secret <key> | Any step |
{{node.install_dir}} | The folder the build is installed to on the server | App launch step only |
{{node.host_application.<identity>}} | The path of preinstalled software on the server, such as vred_core | App launch step only; written by the host application picker |
Names are case-sensitive, and spaces just inside the braces are allowed ({{ secret.db_password }}). There is no way to escape them: every {{…}} is treated as a variable. If a variable cannot be filled in — a typo, a deleted secret, or {{session.user_preferred_username}} for someone who signed in without SSO — the launch fails.
What your application sees
Your application needs no Portal SDK to use a pipeline: everything arrives through standard Windows mechanisms.
| What | Comes from | How the application reads it |
|---|---|---|
| Environment variables | Environment variables, Secrets and Sign in steps | Like any environment variable (examples below) |
| Windows account | Run as a Windows user; otherwise the server's default streaming user | The Windows API: GetUserNameW, or Environment.UserName in .NET |
| Command line | The build's launch arguments, or the App launch step's arguments | argv, or Environment.GetCommandLineArgs() in .NET — see How to use launch arguments |
| Working directory | Default launch: the executable's own folder. App launch step: the build's install folder, unless you set a working directory | The current directory |
// C# — .NET and Unity
string token = System.Environment.GetEnvironmentVariable("OAUTH2_ACCESS_TOKEN");
if (string.IsNullOrEmpty(token))
{
    // Not started by a pipeline (local testing), or the sign-in was skipped.
}
// C++ — Unreal Engine
const FString LicenseKey = FPlatformMisc::GetEnvironmentVariable(TEXT("LICENSE_KEY"));
import os
password = os.environ.get("DB_PASSWORD")
Pipeline variables are added on top of the application's normal environment and are inherited by every process it starts. Windows treats variable names as case-insensitive, so License_Key and LICENSE_KEY are the same variable.
Good practice for applications that read pipeline values:
- Read them once at startup, and handle a missing value, so the same build still runs outside Portal.
- Never log, display or write secret values to disk — crash reports and diagnostics uploads included.
- Read the Windows account name from the Windows API, not from
%USERNAME%.
Secrets
A secret is a value Portal stores encrypted for one application, such as a password, license key or API token. Secrets are write-only: once saved, nobody can display them again, so keep the original in your own password manager.
You manage secrets inside the Secrets step (the sign-in step's client-secret picker can add one, too):
- Add: select Add secret, enter a Key (for example
license_key) and a Value, then Add secret. It is saved immediately. - Replace: select the edit icon next to the key and enter the new value. The next session uses it; running sessions keep the old one.
- Delete: confirm Delete secret?. Steps that still reference the key make the next launch fail.
A secret reaches the application in one of two ways:
- Secrets step: under Inject as environment variables, pair a variable name with a secret. Best when the application expects the bare value.
- Template variable: write
{{secret.<key>}}inside any other value, such as an environment variable holding a whole connection string, or the client secret of the sign-in step.
Rules for keys and values:
- Keys are unique per application and at most 255 characters. Use only letters, digits,
_and-; a key with other characters cannot be used at launch. - Secrets belong to one application. Another application cannot reference them.
- Each Windows environment variable is limited to 32,767 characters. For multi-line content such as a certificate, store it base64-encoded and decode it in your application.
Give applications dedicated, least-privilege credentials (a read-only API key, a license-only account): environment variables are visible to the application and every process it starts. To rotate a credential, replace the secret's value; sessions that start afterwards get the new value.
Use cases
Pass credentials stored on Portal to your application
Store a credential once as a secret, and every session receives it as an environment variable — no credentials in the build, the launch arguments or a config file.
Example: the application connects to a database and expects the password in DB_PASSWORD.
- Open the application's Streaming tab and go to Run Pipeline.
- In Run, select + Add step and choose Secrets.
- Select Add secret, enter the key
db_passwordand the password as value, then Add secret. - Under Inject as environment variables, enter
DB_PASSWORDand selectdb_password. - Select Save step, and start a session to try it.
- In the application, read
DB_PASSWORDat startup (see What your application sees).
Variant — a whole connection string. If the application expects one value that combines settings and a credential, add an Environment variables step and reference the secret inside the value:
| Name | Value |
|---|---|
DB_CONNECTION | Server=sql.example.com;Database=plant;User Id=render;Password={{secret.db_password}} |
PLANT_API_URL | https://api.example.com/v2 |
Variant — per-user values. Combine secrets with session variables, for example LICENSE_USER = {{session.user_email}} next to a shared LICENSE_KEY secret, so a license server or your backend can tell users apart.
Sign the user in with OpenID Connect
The Sign in to an identity provider step lets an unmodified application call your own APIs as the person who is streaming. Before the application starts, the server signs that person in at your identity provider — Microsoft Entra ID, Okta, Keycloak, Auth0 or any other OpenID Connect or OAuth2 provider — and starts the application with the tokens in environment variables. The application needs no login screen and never sees a password.
What the user experiences
- They start the session in Portal. Portal opens your provider's sign-in page in their browser. If they are still signed in there from their Portal login, it completes without typing anything.
- The provider sends them back to Portal, which passes the result to the server.
- The application starts with the tokens. If they don't finish within the sign-in timeout (300 seconds by default), the launch fails — unless you let the application start without tokens.
Set it up
- At your identity provider, register a client for the authorization-code flow.
- In Run Pipeline → Run, add the step Sign in to an identity provider.
- The form shows your organization's redirect URI. Select Copy and register it at your provider character for character. It is the same for every application and session in your organization, so you register it once per client.
- Fill in the step (table below) and select Save step. The editor places the step before the application launch.
| Field | Default | What to enter |
|---|---|---|
| Identity provider | OpenID Connect issuer (recommended) | The issuer URL; the form checks it while you type. Choose OAuth2 endpoints only for providers without discovery. All URLs must be https. |
| Client ID | — | The client ID from your provider |
| Client secret | None — a public client (PKCE only) | Pick a secret, or select Add secret to store the client secret encrypted |
| Scopes | openid | Add your API's scopes. Add offline_access only if the application needs the refresh token. |
| Access token variable | OAUTH2_ACCESS_TOKEN | The variable the application reads the access token from |
| Login hint (Advanced) | {{session.user_email}} | Pre-fills the user name at the provider |
| Pass the ID token / access token expiry / refresh token (Advanced) | Off | Exported as OAUTH2_ID_TOKEN, OAUTH2_ACCESS_TOKEN_EXPIRES_AT (UTC Unix seconds) and OAUTH2_REFRESH_TOKEN; names can be changed |
| Start the app without the tokens if the sign-in fails (Advanced) | Off | On: a failed or abandoned sign-in still starts the application, without the token variables |
| Sign-in timeout (seconds) (Advanced) | 300 | 60 to 1800 |
| Extra authorization parameters (Advanced) | — | For example prompt=select_account, audience or resource. Parameters the flow sets itself, such as scope or redirect_uri, are refused. |
Example: Microsoft Entra ID
- Register the redirect URI under Authentication → Web → Redirect URIs, and create a client secret under Certificates & secrets.
- Issuer:
https://login.microsoftonline.com/<tenant-id>/v2.0— the tenant-specific issuer, notcommonororganizations. - Client ID: the app registration's Application (client) ID.
- Scopes:
openid api://<api-application-id>/.default.
Working with the tokens. Tokens are passed once, when the application starts, and Portal does not refresh them. Access tokens usually expire within an hour, so the step suits applications that call your API at startup (load a model, fetch a configuration). Pass the expiry so the application can ask the user to restart instead of failing with HTTP 401 errors, or pass the refresh token and let the application refresh it. When the session ends, Portal revokes the refresh token where the provider supports it.
The server requests the tokens directly from your provider; they never pass through Portal. Every sign-in uses PKCE.
Good to know
- The user must start the session from a Portal client that can open the sign-in page in their browser, such as Portal in a web browser.
- Time spent signing in is session time, and it counts towards the session's inactivity timeout.
- If you change the login hint to
{{session.user_preferred_username}}, users who signed in to Portal without SSO cannot start the application. - If your application runs its own OAuth2 flow instead, it does not need this step, but redirect handling differs on a cloud-rendering server. Contact Innoactive support before you build on it.
Run the application as a named Windows user
Some software licenses a Windows user name rather than a machine: named-user licenses, license servers that count users, or applications that keep per-user settings. Run as a Windows user starts your application under a local Windows account named the way you choose.
- In Run Pipeline → Run, select + Add step and choose Run as a Windows user.
- Enter the Windows username:
{{session.user_preferred_username}}(the default) — each person gets an account named after their SSO user name, so a license server sees, for example,jdoe.- A fixed name such as
cad-license— every session uses the same account name, for a license bound to one user.
- Select Save step. Portal adds Windows account created to Setup and Windows account removed to Teardown, with the same name.
To pair the account with a license server, add an Environment variables step that points the application at it, for example LM_LICENSE_FILE = 27000@licenses.example.com. The variable name depends on the license vendor.
What happens on the server. At session start, Portal creates a standard local account (member of Users, not an administrator), or reuses it if it already exists from an earlier session. The application starts under that account with its user profile loaded. When the application stops, Portal removes the account again — don't rely on files in the account's profile surviving to the next session.
Name rules. The user name must be a valid Windows account name as it is; Portal never shortens or rewrites a name, because a changed name would license a different user. A name that breaks a rule fails the launch:
- at most 20 characters
- none of
" / \ [ ] : ; | = , + * ? < > @— so an email-style name such asjdoe@example.comfails - not ending in a period
- not a built-in Windows account such as Administrator, Guest or SYSTEM, and not an existing account that Portal did not create
Check what your identity provider sends as preferred_username before using the SSO name. Microsoft Entra ID, for example, usually sends the full sign-in address, which is not a valid Windows name. People who signed in to Portal without SSO have no SSO name, so they cannot start the application.
Limits
- The application must work without administrator rights.
- Applications that launch through preinstalled host applications such as Autodesk VRED Core cannot run as a separate account. The editor warns you, and such a launch fails before anything changes on the server.
- Applications that use the Innoactive Access Control plugin cannot currently run as a separate account: their authorization check fails.
Reach a license server in your own network
VRED projects uploaded as a VPB file don't need this. Autodesk VRED Core is licensed against a central server, and Portal opens and closes the tunnel to it for you: the pipeline shows A tunnel to the license server opens in Setup and The tunnel to the license server closes in Teardown, both marked Automatic. You cannot edit them. If the tunnel cannot be opened, the launch fails instead of starting an application that waits for a license.
For any other application whose license server sits in your own network, ship a small launcher with your build that opens a connection to it (for example an SSH port forward, or a VPN client that runs without administrator rights) before the application starts, and closes it afterwards. Select the launcher as the build's executable when you upload the build. The pipeline supplies the launcher's settings as environment variables and its credentials as secrets.
Portal has no step that runs arbitrary programs, so this logic lives in your build, where it is versioned and tested with the application. Keep in mind:
- The launcher must keep running until the application exits. Portal follows the process it started, so a launcher that exits early ends the session.
- The launcher and application run as a standard user. Full VPN clients that install a network adapter or a Windows service need administrator rights and cannot be started this way.
- If the license server is only reachable through a network-level VPN, or your firewall filters by source address, contact Innoactive support to discuss your setup.
Current limits
- Only the step types in the step reference are available. There is no step that runs an arbitrary command or script, writes files or edits the registry — put such logic in your own launcher.
- Tokens from the sign-in step are issued once, at launch. Portal does not refresh them.
- Running as a separate Windows account does not work with preinstalled host applications such as VRED Core, and currently not with applications that use the Innoactive Access Control plugin.
- Each cloud-rendering server must run a software version that knows the steps in your pipeline. A server that is too old fails the launch with an error instead of silently skipping steps.
Troubleshooting
Most pipeline problems end the session with App could not be launched. Innoactive support can look up the detailed reason for a session.
| Symptom | Likely cause | What to do |
|---|---|---|
| The session ends with "App could not be launched" right after it starts | A template variable could not be filled in: a typo (names are case-sensitive), a deleted secret, a secret key with characters other than letters, digits, _ and -, or {{session.user_preferred_username}} for someone who signed in without SSO | Compare every {{…}} with the template variables table and your secret keys |
| "App could not be launched" mentioning an outdated server version | The server's software does not know a step in your pipeline yet | Contact Innoactive support |
| Launches fail once Run as a Windows user is added | The user name is not a valid Windows name as it is, for example an email address or longer than 20 characters | See the name rules above, or use a fixed name |
| Editor: "This application launches through Autodesk VRED Core, which cannot run under a per-user Windows account…" | VRED Core cannot run as a separate account | Remove the Run as a Windows user step |
| Editor: "The sign-in step comes after the app-launch step…" | Step order | Move the sign-in step up |
| Editor: "The Windows-user steps below don't all name the same account." | The Windows-user steps were changed separately | Delete the Run as a Windows user step and add it again |
| Saving shows "Failed to update the run pipeline" | The pipeline breaks a rule, such as two app-launch steps, or a token variable that another step also sets | Fix the warnings in the editor; give each variable one source |
| The provider reports a redirect URI mismatch | The registered redirect URI differs from the one Portal sends | Copy it from the sign-in step and register it character for character |
| Entra ID rejects the sign-in with an issuer error | The issuer uses common or organizations | Use https://login.microsoftonline.com/<tenant-id>/v2.0 |
| The sign-in page never appears | The session was started from a client that does not open sign-in pages | Start the session from Portal in a web browser |
| The application starts but a variable is missing | The application reads a different name, or the sign-in failed and the step is set to start without tokens | Check the exact variable names |
| The application starts in desktop mode instead of XR | It started before a headset was streaming | Make sure Wait for a streaming client before launching is in Setup |
| A change has no effect | The session was started before you saved | Start a new session |
Two examples
Unreal Engine application — platform-managed XR runtime
This is the pipeline of an Unreal Engine VR application with no changes made — everything shown comes from Portal's defaults and from the build.
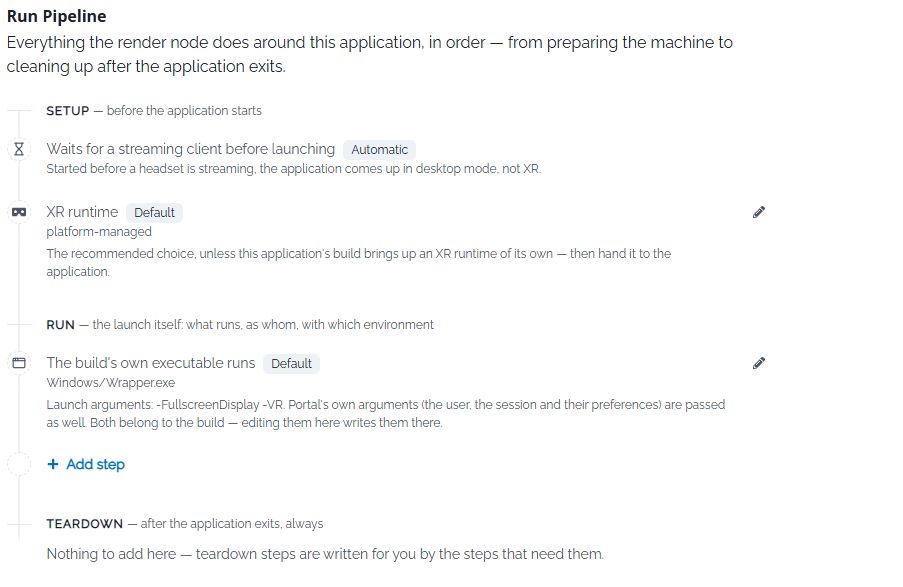
- Setup → Waits for a streaming client before launching (Automatic). The application is held back until a headset is streaming. Started before that, it would come up in desktop mode instead of XR.
- Setup → XR runtime: platform-managed (Default). Portal takes care of the XR runtime: it configures it, starts it before the application and stops it afterwards. This is the recommended choice unless the build brings up an XR runtime of its own.
- Run → The build's own executable runs (Default). The server starts the executable set on the build (here
Windows/Wrapper.exe) with the build's launch arguments (here-FullscreenDisplay -VR). Portal's own arguments — the user, the session and their preferences — are passed as well. Both belong to the build: editing them here writes them to the build.
Autodesk VRED Core project (VPB file) — license-server tunnel
This is the pipeline of a VRED project uploaded as a VPB file, with no changes made. Next to the XR runtime, Portal adds the license-server tunnel on its own.
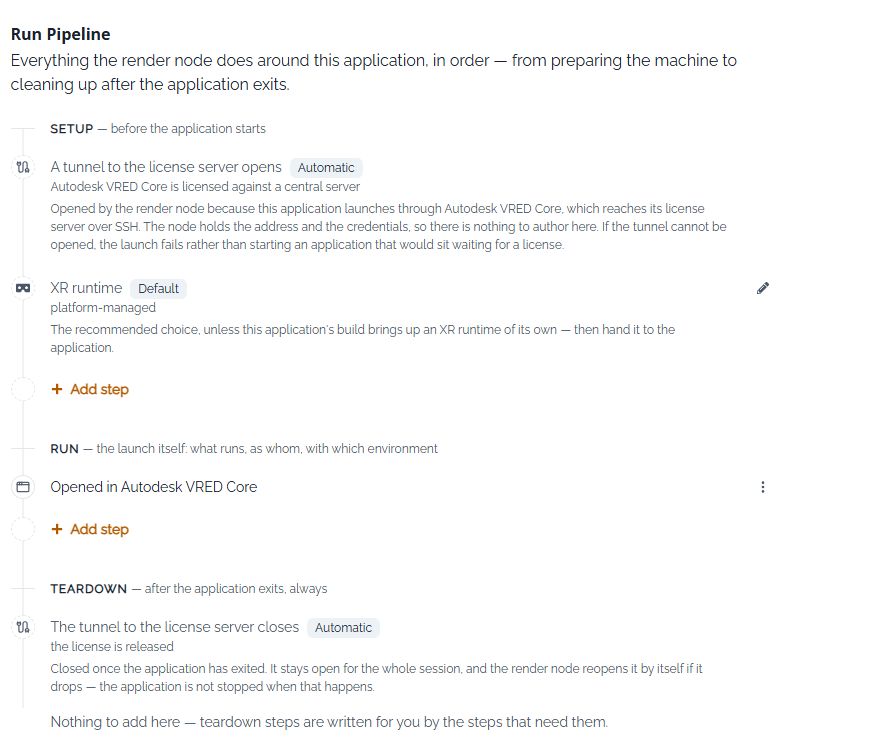
- Setup → A tunnel to the license server opens (Automatic). Autodesk VRED Core is licensed against a central server, which the render node reaches over SSH. The node holds the address and the credentials, so there is nothing to author. If the tunnel cannot be opened, the launch fails.
- Setup → XR runtime: platform-managed (Default). Same as for other applications.
- Run → Opened in Autodesk VRED Core. The server starts VRED Core with your project.
- Teardown → The tunnel to the license server closes (Automatic). The tunnel stays open for the whole session and closes once the application has exited. The render node reopens it by itself if it drops; the application is not stopped when that happens.
Autodesk VRED application — application-managed XR runtime
This VRED Core application brings up and manages its own XR runtime, so its pipeline opts out of platform-managed XR.

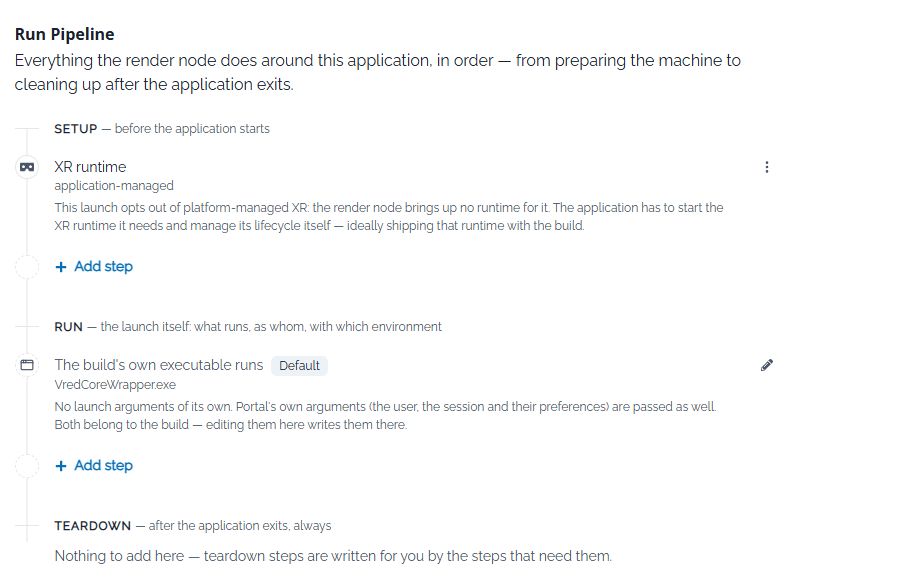
- Setup → XR runtime: application-managed. The server brings up no XR runtime for this launch. The application (here its wrapper) takes full responsibility for the XR runtime: it configures and starts the runtime it needs — ideally one shipped with the build — and stops it completely when the session ends, so the next session on the server starts clean. See Platform-managed or application-managed XR runtime.
- Run → The build's own executable runs (Default). The server starts
VredCoreWrapper.exe. The build defines no launch arguments of its own; Portal's own arguments are still passed.
To switch an application between the two modes, select the edit icon (or the ⋮ menu) next to XR runtime and pick Platform-managed or Application-managed.